
To fix this problem, we strong think this customer need to use Samsung Data Recovery to simplize the data recovery process. There are many ways to recover the lost and deleted data from a smart phone, but using Samsung Data Recovery can make the process more easy and we believe you won't regret your choice.
With wide compatibility range from Samsung J series to other Anderoid phone, like HTC, Huawei and more, Samsung Data Recovery can help you restore lost and deleted data from your device. To Samsung Data Recovery, it is not hard to recover lost contacts, messages, photos and so on. Lost data on your device is not lost, because Dr Fone can recover files from many common scenarios, such as deleted, SD card issue, rooting error and more others.


Steps to recover lost data from Samsung Galaxy J1:
Step 1.Launch the Program and Connect Samsung J1 on the Computer
Download, install properly and open the program on your computer. Then, please connect your Samsung J1 to the computer with USB cable.

Step 2. Empower USB Debugging
If you were this first time use Samsung Data Recovery or connect your device to the computer, you need to empower USB debugging. If your connected device is recognized, you can skip this step.

Step 3.Choose the Files to Scan
After detecing, all data from your phone will appear on the screen quickly in catalogues. You can choose the files you want to recover to scan and click "Next" button.

Step 4. Analyze and Scan Lost Data from Samsung J1
Please click "Start" button to begin analyzing and scanning your phone.
Choose the right sacn mode for your device betwwen "Standard Mode" and "Advanced Mode". In general, "Standard Mode" is the common choice. But if you find the base root fails, you can choose "Advanced Mode".

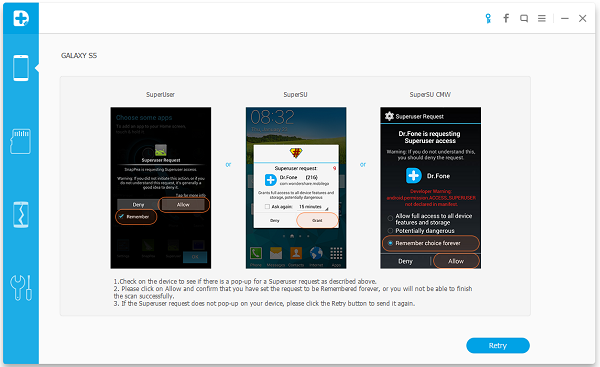
There are something you need to pay attention to in this step: Maintain the battery power of your phone more than 20%.
In addition, if a Superuser authorization appearing on your device during the scan, please click "Allow" to confirm it.
Step 5. Preview and Restore Deleted Data from Samsung J1/J2/J3/J5/J7
When scan finishes, you can preview all deleted and existing data. Please select the files that you want to regain and click “Recover” button to save all them on the computer.
Note:If you want to distinguish the deleted and existing files, there are two ways. One is turning on the button of "Display deleted files only", the other is using the search function on the top right to search what you need in the scan result.

More info:
No comments:
Post a Comment
Note: Only a member of this blog may post a comment.