In the past, users don't know how to recover deleted photos from samsung galaxy A9, but now, recovering deleted data for users' need is an easy operation.The reason for that is the professional data recovery software is developed.

Among lots of recovery softwares, Samsung Data Recovery is the most extraordinary one. Samsung Data Recovery is fully compatible with 6000+ Android devices, like Samsung, Motorola, LG, HTC and so on. It can help you recover your deleted contacts, messages, music, documents and any other om your android phone.
Here, let's see Samsung Data Recovery how to recover deleted photos on Samsung A9 for a customer.


Steps to recover deleted photos on Samsung A9.
Step 1. Connect Your Samsung A9
Please use a USB cable to connect your Samsung A9 to the computer.
Launch Samsung Data Recovery on the computer and enter "Android Data Recovery".

Do not open any other Android phone management software.
If your connected device can't be recognized by the program, you need to enable the USB debugging.

Step 2. Slect Needed File to Scan
Now, you can see eight file types from your Smasung A9. Select "Gallery" to scan and press " Next" button to enter next step.

Step 3. Analyze and Scan Your Device
Here, the program show you two scan modes to choose. One is "Standard Mode", the other is "Advanced Mode". Read the descriptions of the two modes, and select the suitable one.
Then, click "Start" button to allow the program to analyze and scan the data on your device.

During the scanning, please conform the notes as follow:
1. Please do not disconnect your device.
2. Select the directory on the left to preview the data thta has been scanned.
3. Recovery success will vary depending on how the data was lost, and the devices condition. Unscanned files may have been overwritten by new data crated on the device after the initial data loss.
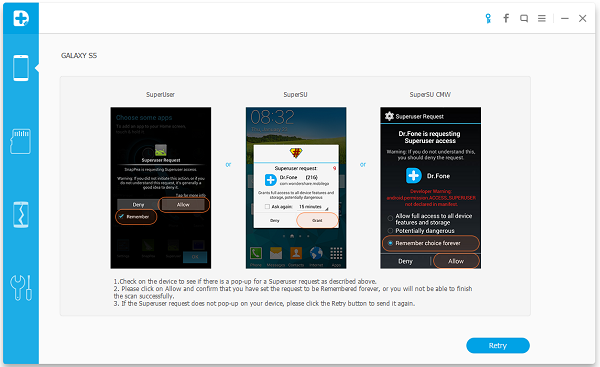
4. If a superuser authorization appears on your device, click "Allow" button to confirm it.
Step 4. Recover Deleted Data on Your Device
When the scan is complete, you can preview the found data one by one.
Entering "Gallery", check the items you want and click "Recover" to save them all on your computer.

The found data are both existing and deleted data. If you just want to see the deleted data, you can open the button of "Display deleted files only" or use the search function on the top right.


More Related Articles:
Recover Deleted SMS Text Messages from Samsung Note 7
No comments:
Post a Comment
Note: Only a member of this blog may post a comment.